
10 Must-Check Items on Your Home Inspection Checklist
Article Recap & Author
This comprehensive guide, authored by Fred Rodrigues, a Certified Master Inspector with thousands of inspections completed in Florida, provides an essential checklist for home inspections. It covers critical structural components like foundations and roofs, major systems including HVAC, plumbing, and electrical, and key interior areas such as attics and basements. The article also details common issues like water damage, mold, and pests, and offers strategies for pre-listing inspections, effective report interpretation, and addressing environmental hazards. It’s designed to empower buyers, sellers, and homeowners to navigate the inspection process confidently, prioritize repairs, and make informed decisions.
A home inspection assesses a property’s visible systems for safety, function, and repair needs. This guide explains what inspectors look for, why each area matters, and how findings impact safety, value, and negotiation. Buyers, sellers, and homeowners will learn essential areas, distinguish urgent from deferred issues, and prioritize repairs. The article covers structural components, major systems, interior areas, common defects, pre-listing strategies, report interpretation, and environmental/safety testing, with checklists and tables for confident decision-making.
What Are the Most Critical Structural Components to Inspect in a Home?
Structural integrity is vital for a home’s safety and value. Inspectors check the foundation, roof, and load-bearing elements for movement, water intrusion, and deterioration. Early identification of issues like cracks or uneven floors saves time and money. The most critical components are listed below to guide inspection priorities and negotiation.
The three most critical structural components to inspect are:
- Foundation: Visible cracks, settlement, or moisture indicate potential structural movement that affects safety and resale value.
- Roof and attic framing: Rot, sagging rafters, or failed flashing lead to leaks and interior damage if not fixed promptly.
- Exterior walls and load-bearing members: Bowing, large vertical or stair-step cracks, or compromised framing point to serious structural stress.
This comparison of foundation types, defects, and repair costs helps understand urgency and budget.
The table clarifies how foundation type and defects translate into remediation scales, emphasizing specialist estimates for safety and negotiation.
How Do Foundation Issues Affect Home Safety and Value?
Foundation issues compromise structural stability, affecting safety and marketability. Causes include poor drainage or plumbing leaks; identifying the root cause is essential. Symptoms like stair-step cracks or sloped floors indicate urgency. Structural engineer assessments and contractor estimates are crucial for negotiation. Foundation problems can also impact financing and insurance. Documenting symptoms, getting specialist evaluations, and securing repair estimates are key. The roof is next, as water intrusion often drives foundation deterioration.
What Signs Indicate Roof Damage or Wear?
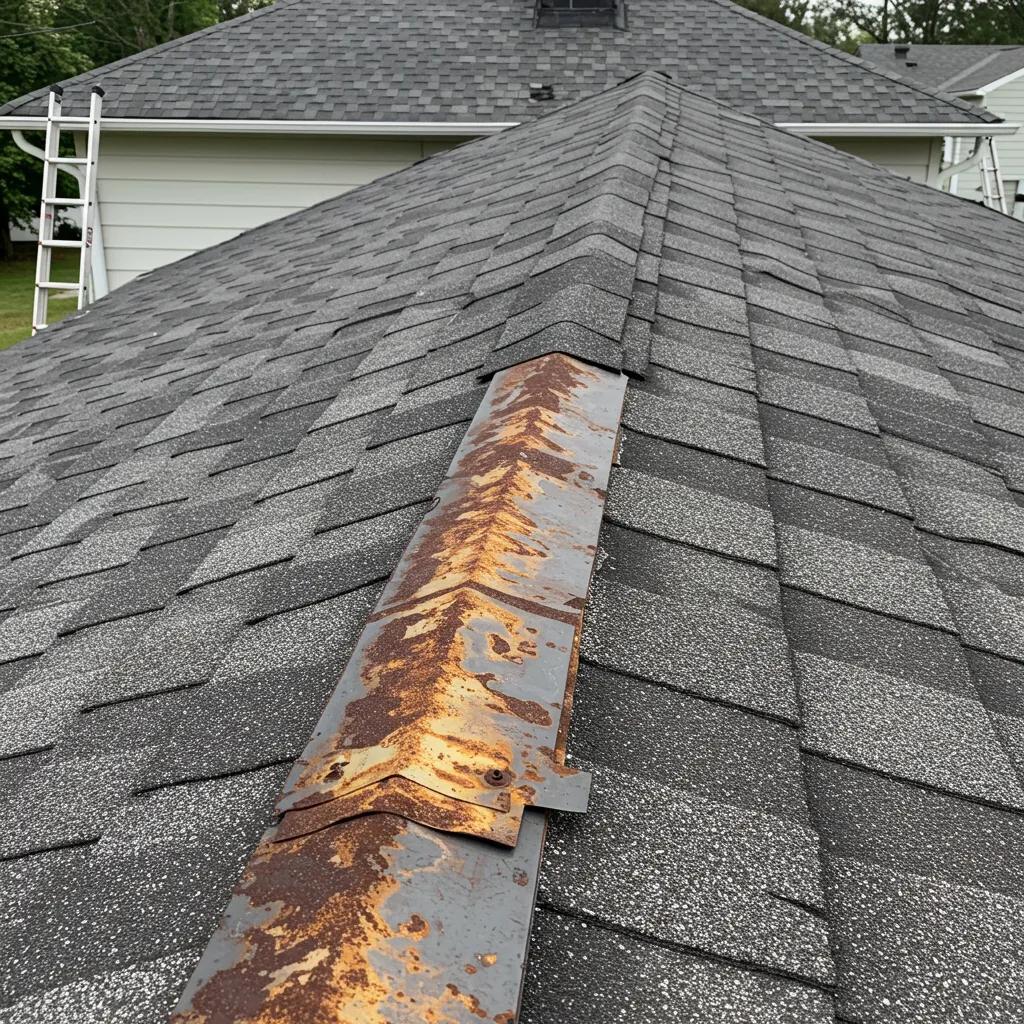
Roof condition protects against water intrusion. Inspectors check for missing/buckled shingles, granule loss, rusted flashing, and interior water stains. Age and damage dictate urgency. Active leaks require immediate repair. Triage includes checking for sagging rooflines, compromised flashing, and clogged gutters. Concentrated damage or moisture necessitates a roofing contractor estimate. Next, interior finishes are examined, as roof leaks often appear on ceilings and walls.
Why Is Inspecting Walls, Floors, and Ceilings Important?
Walls, floors, and ceilings reveal a home’s structural and moisture health. Inspectors look for bulges, cracks, discoloration, and soft spots, distinguishing cosmetic from systemic problems. Triage determines if simple patching or specialist evaluation is needed. If underlying issues are suspected, moisture metering and specialist quotes are recommended. Early action prevents cascading failures, preserves value, and aids negotiation. Next, major mechanical systems are evaluated.
How Should You Evaluate Major Home Systems During an Inspection?
Major systems—HVAC, plumbing, electrical—impact safety, utility costs, and replacement timelines. Inspectors assess age, condition, and safety elements, focusing on hazards, deferred maintenance, and end-of-life components. A checklist helps prioritize specialist estimates or immediate repairs. The table below outlines typical checks.
This table helps prioritize immediate concerns versus later maintenance. H3s detail checks and DIY actions.
What Are Key HVAC System Checks for Heating and Cooling Efficiency?
HVAC inspections assess operational status and remaining life, considering age, maintenance history, operation, filter condition, and ductwork leaks. Homeowners can pre-check filters and thermostat. If imminent failure or poor efficiency is flagged, an HVAC technician’s estimate is crucial for negotiation and budgeting. Efficiency metrics can justify price adjustments. Documented deficiencies influence contingencies, guiding repair versus credit decisions. Plumbing checks are next, often revealing hidden leaks.
How to Identify Plumbing Problems Like Leaks and Water Pressure Issues?

Plumbing issues appear as visible leaks, stains, or slow drains, but hidden problems require careful testing. Inspectors check water pressure, fixture performance, piping for corrosion, and water heater age. Homeowners can assist by running hot water and checking for moisture. Urgent defects like active leaks or sewage backup need immediate contractor estimates. Understanding pipe materials clarifies risks. Suspected systemic issues require pressure testing, specialist evaluation, and cost estimates. Next, electrical systems are assessed for safety.
What Electrical System Components Must Be Inspected for Safety?
Electrical inspections prioritize safety, focusing on the main panel, circuit labeling, breaker condition, wiring types, and GFCI/AFCI outlets. Inspectors check for warm panels, rust, double-tapped breakers, and outdated wiring. Testing GFCI/AFCI outlets and grounded receptacles is standard. Hazardous conditions require immediate electrician evaluation and repair estimates. Documented deficiencies influence negotiations. Clear electrician quotes help prioritize safety upgrades. Next, interior areas are examined for moisture, insulation, and pests.
What Interior Areas and Features Are Essential to Inspect?
Interior areas like the attic, basement/crawl space, and windows/doors reveal a home’s moisture management, energy efficiency, and security. Inspectors evaluate these for broader issues. Proper attic ventilation prevents moisture; basements/crawl spaces are common mold/rot sources. Windows/doors show energy loss. A checklist helps detect problems early and prioritize fixes. H3s detail checks and responses.
Why Inspect the Attic and Insulation for Moisture and Pest Issues?
The attic and insulation are crucial for a home’s thermal envelope. Inspections focus on ventilation, insulation level, roof deck staining, and pest evidence. Inspectors check insulation depth, look for daylight at roof edges, and examine vents. Pest activity damages wiring and reduces insulation, requiring pest control and repair. Addressing attic issues involves improving ventilation, replacing compromised insulation, and sealing access points. Correcting these problems reduces energy bills and prevents rot/mold. Next, basements and crawl spaces are inspected for moisture and radon.
How to Detect Basement and Crawl Space Moisture or Radon Hazards?
Basements and crawl spaces often show water intrusion (efflorescence, musty odors). Inspectors assess grading, gutters, and sump pump condition for moisture mitigation. Radon testing is recommended in many regions due to health risks. Mitigation includes improving grading, sump pump repair, interior drainage, and vapor barriers. Chronic moisture or elevated radon requires a specialist remediation quote. Timely testing and mitigation are high negotiation priorities. Next, windows and doors are examined for energy performance and security.
What Should You Look for When Checking Windows and Doors?
Windows and doors impact energy efficiency, comfort, and security. Inspectors test operation, seals, frame condition, and glass. Fogging indicates seal failure; warped frames suggest moisture or settlement. Weatherstripping, locks, and thresholds are checked. Simple fixes like replacing seals or re-caulking improve performance, but full replacement may be needed. Knowing replacement costs helps prioritize repairs. Documented deficiencies provide negotiation leverage. Next, common inspection issues are cataloged.
What Common Home Inspection Issues Should Buyers and Sellers Know?
Inspections often reveal common defects: water damage, mold, pests, and outdated systems, impacting health, safety, and marketability. Distinguishing cosmetic from structural/health issues helps prioritize responses and negotiation. This section lists findings, triage priorities, and when specialist testing or replacement is needed. H3s offer detection tips and guidance.
How to Spot Water Damage and Mold During an Inspection?
Water damage and mold are detected by discoloration, peeling paint, warped surfaces, and musty odors. Inspectors use moisture meters to confirm active leaks. Visible mold with structural decay requires prompt remediation estimates. Suspected hidden mold warrants professional testing and remediation quotes. Prioritization depends on active spore release, structural impact, or cosmetic discoloration. Remediation involves stopping moisture, drying/removing damaged materials, and remediating contamination. Documented plans aid negotiation. Next, pest infestations are considered.
What Are the Signs of Pest Infestation and Structural Damage?
Pest infestations leave signs like termite mud tubes or rodent droppings, often correlating with hidden structural damage. Inspectors document evidence and recommend specialist pest inspections for active infestation or significant wood loss. Pest-induced structural compromise requires combined treatment and repair estimates. Prompt specialist intervention and documented treatment plans are crucial for occupant protection and negotiation. A pest specialist’s estimate clarifies needed repairs. Next, outdated systems and missing safety features are discussed.
Why Are Outdated Systems and Safety Features Important to Identify?
Outdated systems (old wiring, panels, heating) and missing safety devices (GFCI/AFCI) pose hazards, affecting insurance and mortgages. Inspectors prioritize knob-and-tube wiring, ungrounded outlets, or insufficient smoke/CO detectors. Upgrading these systems can be costly but necessary for transactions. Distinguishing safety-critical from aesthetic items helps buyers/sellers decide on repairs, credits, or price adjustments. Licensed electrician or HVAC quotes provide negotiation baselines. Prioritizing safety-first items creates a defensible negotiation strategy. Next, pre-listing inspections for sellers are covered.
How Can a Pre-Listing Home Inspection Benefit Sellers?
A pre-listing inspection helps sellers identify issues early, reduce surprises, and build confidence through transparent disclosures. It allows for targeted repairs, realistic pricing, and documentation that reduces renegotiation risk. Pre-listing reports streamline closing. The following outlines strategic advantages and negotiation impacts.
- Transparency and trust: Sharing a recent inspection report can reassure buyers and reduce renegotiation.
- Pricing confidence: Knowing defect scope allows sellers to set a market price that reflects condition accurately.
- Faster closings: Addressing major items beforehand reduces the back-and-forth during buyer inspections.
Sellers should weigh repair costs against price uplift, prioritizing safety and systems affecting offers. Targeted repairs and clear disclosures lead to smoother transactions.
How Does a Pre-Listing Inspection Influence Negotiations and Pricing?
A pre-listing inspection offers documentation to justify pricing or present repair credits, shifting negotiation to solutions. For minor defects, sellers can repair; for major items, they can offer quotes or credits. Prioritizing safety, major systems, then cosmetic items helps allocate repair budgets. Itemized estimates and transparent disclosures reduce buyer leverage and speed closings. Sellers should obtain firm contractor quotes and present them with the report to streamline buyer decisions. Next, interpreting an inspection report is discussed.
How Do You Understand and Use a Home Inspection Report Effectively?
A home inspection report translates conditions into actionable items with a summary, detailed findings, photos, and next steps. The summary highlights high-priority safety issues; detailed findings provide specifics for specialist quotes. Prioritization focuses on immediate safety, major-cost systems, then cosmetic defects, guided by specialist estimates. H3s explain report elements and a framework for prioritizing repairs.
What Key Elements Are Included in a Typical Home Inspection Report?
Reports begin with a concise summary of significant issues, followed by detailed findings, including photos, severity notes, and inspection limitations. Photos and location descriptors help contractors scope repairs, and severity ratings clarify safety-critical versus cosmetic items. Reports often include maintenance tips, system lifespans, and specialist follow-ups. Understanding the summary versus detailed section is key. Exclusions should be noted and re-inspected if critical. Clear documentation streamlines repair quotes and negotiation. Next, a prioritization framework is used.
How Should Buyers and Sellers Prioritize Repairs and Negotiations?
Prioritize repairs by addressing safety/code issues first, then major-cost systems, and finally cosmetic upgrades. Use specialist quotes to decide on pre-closing repairs, credits, or price adjustments; documented estimates support fair negotiation. Request repairs for safety-critical items and credits for large, discretionary replacements. This balances transaction momentum with financial prudence. In disputes, objective estimates and photos shift discussions to evidence. Consider hiring a professional inspector for re-inspection before finalizing negotiations.
For clarity and stronger negotiation, consult a licensed home inspector to clarify ambiguous findings.
What Safety Features and Environmental Concerns Are Checked During Inspections?
Safety and environmental checks focus on life-protecting devices (smoke/CO detectors) and health hazards like radon and mold. Inspectors verify detector presence/function, assess ventilation/moisture, and recommend specialized testing. Identified hazards lead to actions from device replacement to full remediation. The table below summarizes common hazards, checks, and next steps.
Why Are Smoke and Carbon Monoxide Detectors Critical to Inspect?
Smoke and carbon monoxide detectors are critical life-safety systems, providing early warning for fire and CO. Inspectors verify placement, functionality, and power source, testing buttons, checking expiration dates, and ensuring location near sleeping areas and on each level. Missing or non-functioning detectors are immediate safety items needing correction. Replacing outdated units and confirming interconnection is essential. These low-cost, high-impact fixes are top repair priorities. Next, radon testing may be a priority.
How Is Radon Testing Conducted and Why Is It Important?
Radon testing measures naturally occurring radioactive gas, increasing lung cancer risk. Tests are short-term or long-term, available professionally or DIY. Inspectors recommend testing in moderate-to-high radon regions or with poor ventilation. Mitigation (e.g., soil depressurization) is effective if levels exceed thresholds. Including radon testing in contingencies gives buyers health-risk data and remediation costs for negotiation. Testing decisions consider seasonality and home use. Other environmental hazards are next.
What Other Environmental Hazards Should Be Considered?
Other environmental hazards include mold, asbestos, lead paint, and underground storage tanks, requiring specialist testing. Indicators like disturbed insulation (asbestos), peeling paint (lead), or visible fungal growth prompt referral to licensed environmental specialists. Remediation varies widely in cost and timeline for each hazard. When potential risks are identified, specialist testing and remediation estimates clarify health risks and negotiation options. Addressing hazards prioritizes occupant safety, licensed remediation quotes, and documented plans. Schedule professional inspections or specialized tests for safe, informed transactions.
Conclusion
Understanding home inspection essentials empowers buyers and sellers to make informed decisions, enhancing safety and property value. Focusing on structural integrity, major systems, and environmental hazards helps prioritize repairs and negotiate effectively. Pre-listing inspections streamline the process, reducing surprises and fostering transparency. Consult a licensed inspector today.